CloudCusp Mailer is a WordPress-native marketing solution that brings email campaigns, automation, subscriber management, and push notifications into a single admin interface. One of its practical features is support for importing Canva templates, allowing teams to design polished email layouts in Canva and then use them directly inside CloudCusp Mailer.
This page explains the complete process of designing email templates in Canva, preparing them for import, bringing them into CloudCusp Mailer, customizing them, and using them in campaigns and automations. The steps are written clearly so that both beginners and experienced users can follow them without difficulty.
Table of Contents
Why Use Canva Templates with CloudCusp Mailer
Canva is widely used for creating visual designs because of its simple interface, large template library, and brand kit features. CloudCusp Mailer handles the email delivery, personalization, segmentation, automation, and tracking side of marketing inside WordPress.
Combining the two tools offers several advantages:
- Design work stays in a familiar visual editor.
- Finished designs can be imported into a reusable template library inside WordPress.
- Templates remain available for multiple campaigns and automation sequences.
- All marketing activity continues to run from the WordPress admin without depending on external email platforms for basic operations.
- Brand consistency is easier to maintain across different types of emails.
The overall workflow is straightforward: design in Canva, prepare the design for import, bring it into CloudCusp Mailer, make necessary adjustments, and then use the template in campaigns or automations.
Prerequisites
Before starting, ensure the following are in place:
- A WordPress site with CloudCusp Mailer installed, activated, and properly licensed.
- Access to a Canva account (free or Pro).
- Basic familiarity with the CloudCusp Mailer dashboard, especially the Templates section.
- Clear understanding of the email purpose (welcome email, product announcement, newsletter, promotional offer, etc.).
Having these ready helps avoid interruptions during the process.
Step 1: Design the Email Template in Canva
Start by creating the email design in Canva with email constraints in mind.
Recommended practices for email design in Canva:
- Use a width of approximately 600 pixels, which is the standard for most email clients.
- Prefer relatively simple layouts. Complex multi-column designs or heavy visual effects can break in certain email clients.
- Rely on clear hierarchy: logo or header at the top, main message, supporting content, and a clear call-to-action.
- Use readable fonts and sufficient contrast between text and background.
- Keep important text and buttons large enough for mobile users.
- Compress images before or during design to keep the overall email size reasonable.
- Add meaningful alt text to images where possible.

You can begin with one of Canva’s existing email templates or create a custom-sized design. Apply your brand colors, logo, and fonts using Canva’s Brand Kit for consistency.
Once the design is complete, review it carefully in both desktop and mobile previews inside Canva. Make any final adjustments to spacing, alignment, and content before proceeding.
Step 2: Prepare the Design for Import
After finalizing the design, prepare it in a format suitable for import into CloudCusp Mailer.
Common preparation methods include:
- Exporting the design as HTML with associated images when Canva provides that option.
- Downloading the design assets in a structured way that CloudCusp Mailer can process (Download as HTML and Images).
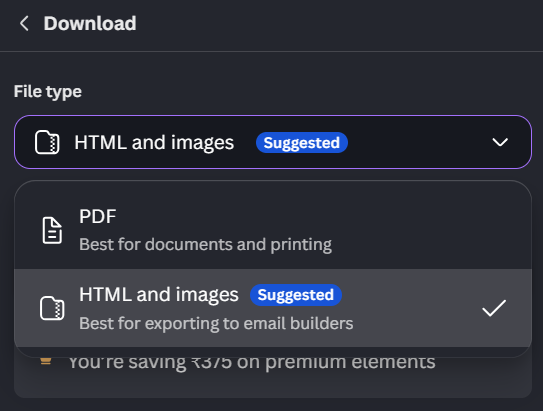
Save the exported zip in an organized location so they are easy to locate during the import step.
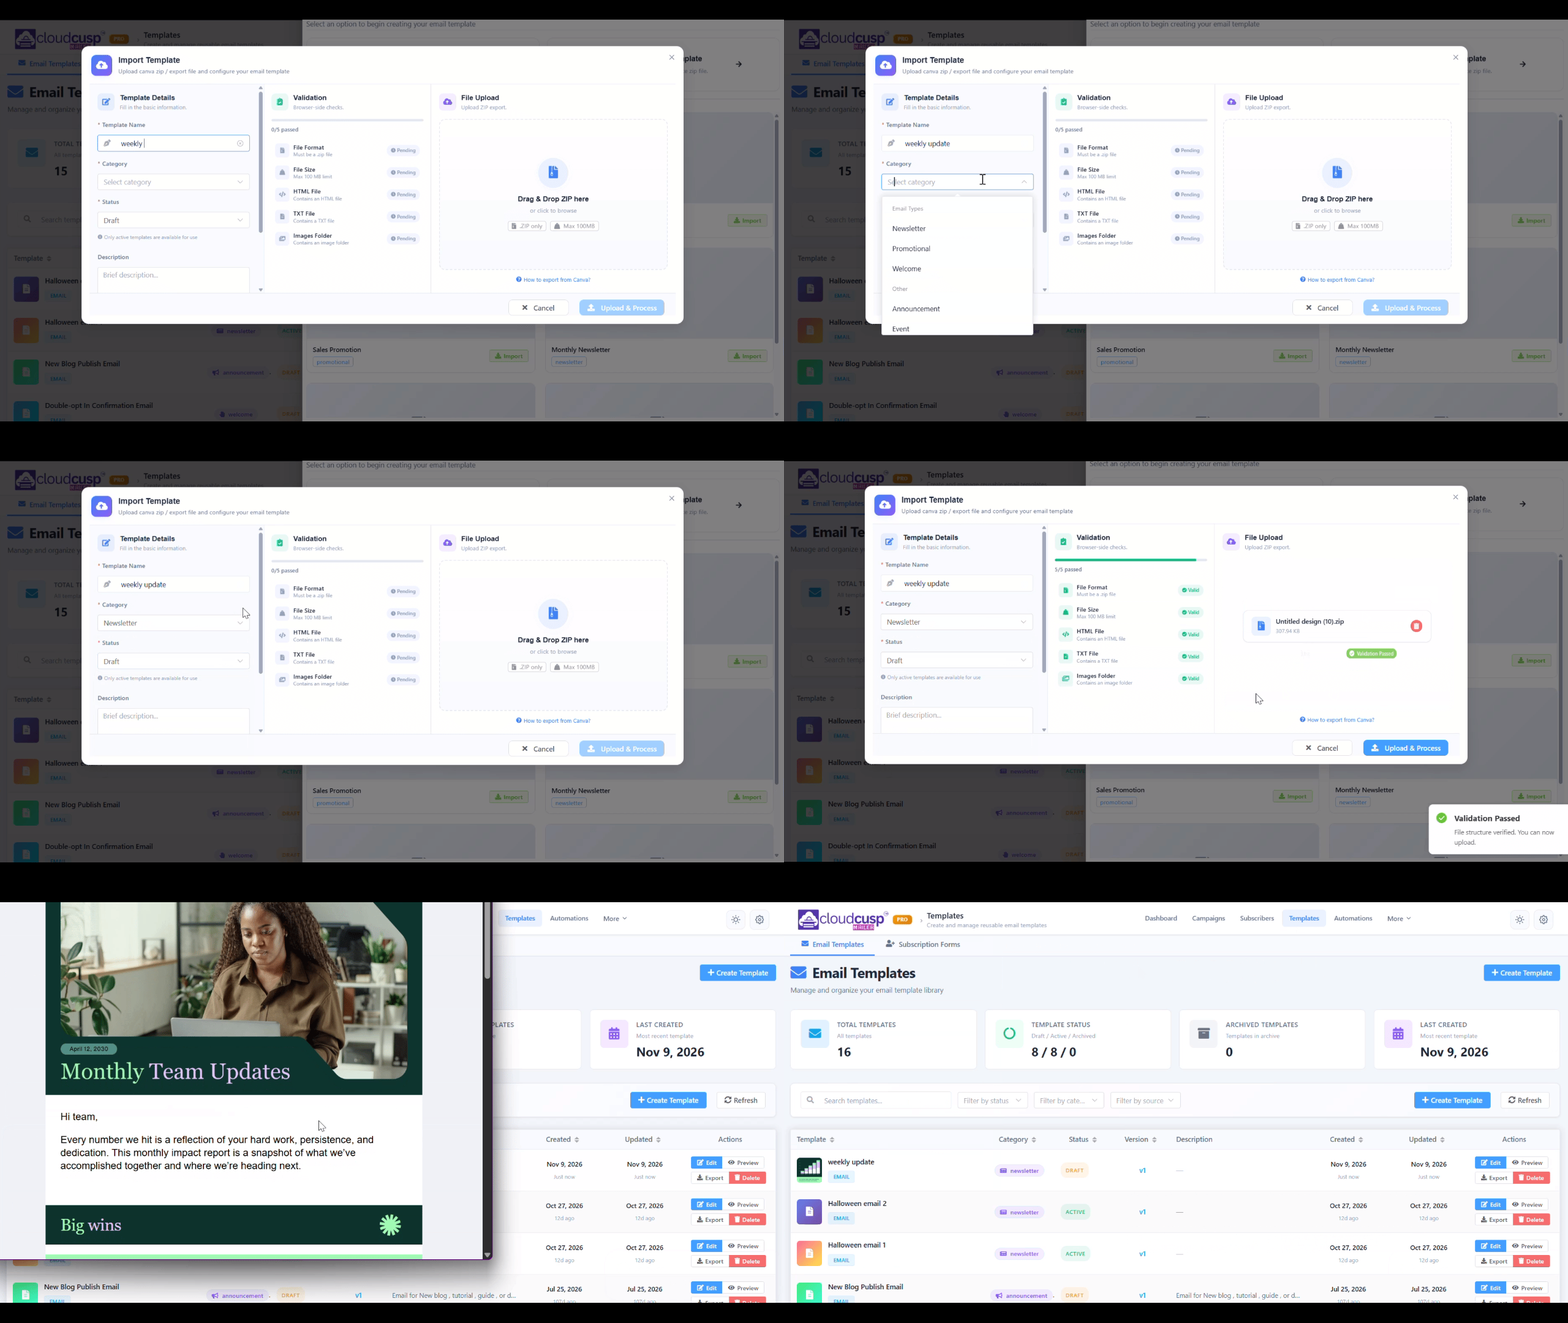
Step 3: Import the Canva Template into CloudCusp Mailer
Follow these steps to bring the design into CloudCusp Mailer:
- Log in to the WordPress admin area.
- Navigate to the CloudCusp Mailer menu.
- Open the Templates section.
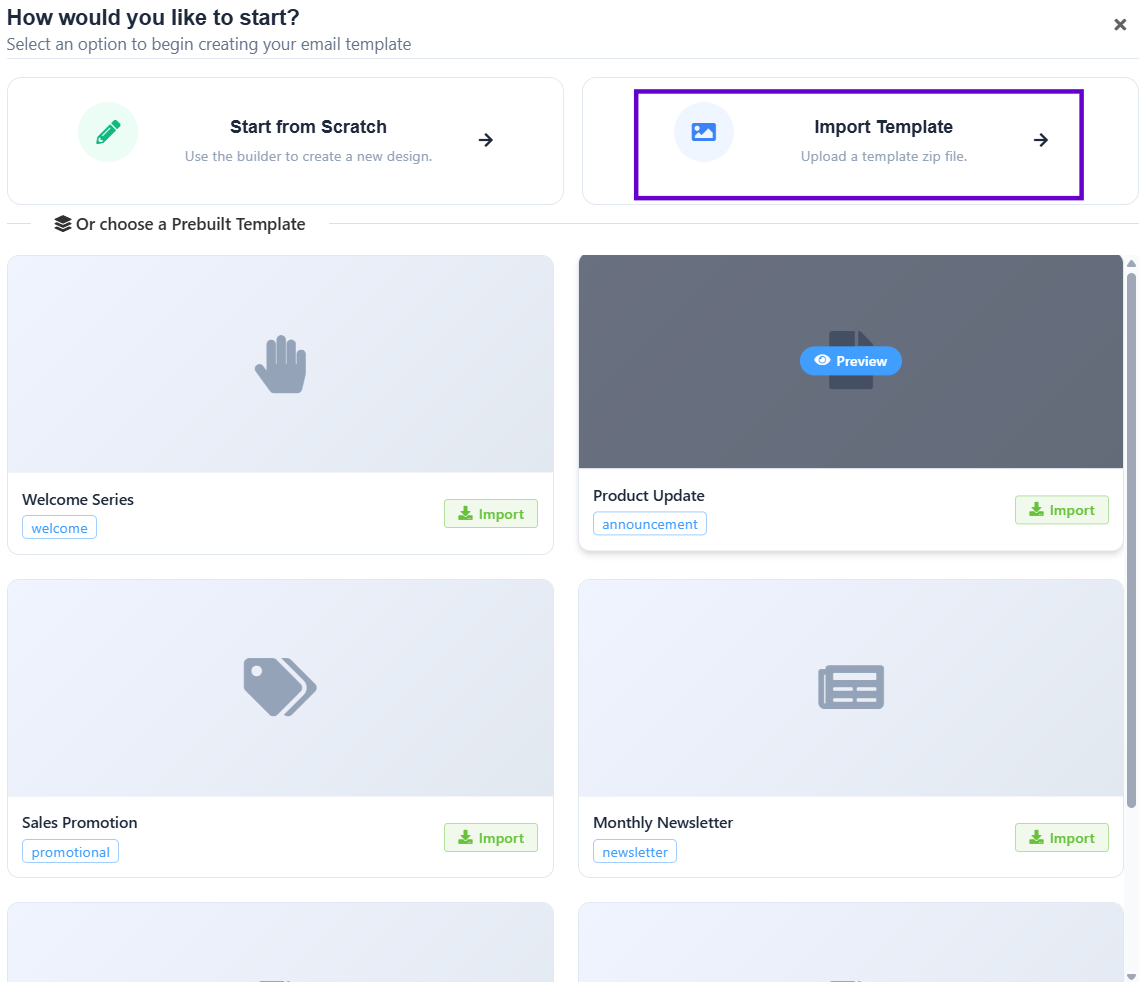
- Choose the option to create a new template or import a design.
- Select the Canva import or upload method provided by the plugin.
- Upload canva exported zip file.
- Assign a clear and descriptive name to the template (for example, “Welcome Email – Main Offer – November 2026”).
- Validate and upload.
Once saved, the template appears in the CloudCusp Mailer template library and becomes available for use across campaigns and automations.
Step 4: Customize the Imported Template
After import, review and refine the template inside CloudCusp Mailer. Typical adjustments include:
- Adding personalization tags such as first name or other subscriber fields.
- Verifying and updating links, including tracking parameters where needed.
- Ensuring required elements such as unsubscribe information and company details are correctly placed.
- Checking button functionality and link destinations.
- Reviewing spacing, image display, and overall layout on different screen sizes if preview options are available.
- Making small text or image updates if the design needs minor refinements after import.
- Change Template status form Drafts to Active.
The objective is to make the template fully functional within the CloudCusp Mailer environment while preserving the visual quality created in Canva.
Step 5: Use the Template in Campaigns and Automations
With the template ready, you can apply it in different marketing activities:
- Create a new email campaign and select the saved template as the starting point.
- Insert the template into automation sequences such as welcome series, nurture flows, or re-engagement campaigns.
- Combine the template with lists and tags for targeted sending.
- Schedule or send the campaign.
- Monitor performance through the analytics and reporting features available in CloudCusp Mailer.
Because the template is stored in the library, it can be reused and lightly modified for future campaigns without starting from scratch each time.
Best Practices for Effective Use
Following a few consistent practices improves results over time:
- Maintain a clear naming convention for templates so they remain easy to find and organize.
- Create a small set of core templates (for example, welcome, newsletter, promotional, and transactional-style) and adapt them as needed rather than designing every email from zero.
- Keep brand elements consistent across templates by relying on Canva’s Brand Kit and careful import practices.
- Always send test emails to multiple addresses and email clients before launching a campaign.
- Review performance metrics regularly to identify which layouts and styles generate better engagement.
- Update templates thoughtfully when brand guidelines or messaging change, and keep older versions archived if needed for reference.
Common Issues and How to Address Them
| Issue | Possible Cause | Recommended Action |
|---|---|---|
| Design looks different after import | Complex layout or unsupported elements | Simplify the Canva design and re-import |
| Images not displaying correctly | Missing assets or path issues | Re-export with all images included and re-import |
| Layout breaks on mobile | Design not optimized for smaller screens | Adjust the design in Canva with mobile preview and update the template |
| Personalization tags not working | Tags not added or incorrectly formatted | Add or correct tags inside the CloudCusp Mailer editor |
| Template hard to locate later | Poor naming | Use descriptive names that include purpose and date or version |
| Slow loading or deliverability concerns | Large image files | Compress images before finalizing the Canva design |
Addressing these points early reduces friction and improves the reliability of the finished emails.
Practical Tips for Long-Term Efficiency
- Limit heavy redesigns after import. Most visual work should be completed in Canva.
- Keep a simple internal process for requesting, designing, importing, and approving templates if multiple people are involved.
- Periodically review the template library and remove or archive outdated versions to keep the system organized.
- Use segmentation and automation features in CloudCusp Mailer to get more value from well-designed templates rather than sending the same message to the entire list every time.
WrapUP
Using Canva templates with CloudCusp Mailer provides a practical way to create professional-looking emails while keeping the entire marketing workflow inside WordPress. The process involves designing in Canva with email best practices in mind, preparing the design for import, bringing it into the CloudCusp Mailer template library, making necessary functional adjustments, and then applying the template in campaigns and automations.
When followed consistently, this approach saves time, supports brand consistency, and makes it easier to scale email marketing activities without relying on a fragmented set of external tools.
For additional product details and related resources, refer to the official CloudCusp Mailer page and supporting materials.
References
- CloudCusp Mailer: https://cloudcusp.com/mailer/
- CloudCusp official channel for product tutorials: https://www.youtube.com/@cloudcusp