Let me take you back to a Tuesday afternoon a few years ago. I was sitting at my desk, coffee in hand, staring at a monitor. My task? Implement push notifications for an app that was about to launch in a week. I had done it before, but back then, it meant dealing with the painful, clunky mess of Apple Push Notification service (APNs) certificates on iOS, and Google Cloud Messaging (GCM) on Android. It was a headache.
Then, I discovered Firebase Cloud Messaging (FCM). Suddenly, what used to take days of wrestling with backend logic and platform-specific certificates took just a few hours. FCM wasn’t just a tool; it felt like Google had handed me a magic wand.
If you are reading this, you are probably where I was that Tuesday. You want to understand what FCM is, how it works, and how to implement it without losing your mind. I’m going to walk you through everything I’ve learned about FCM over the years—the good, the bad, and the “why isn’t this token working?!” moments. We’ll skip the overly academic jargon and talk about it like we’re having a conversation at a coffee shop. Let’s dive in.
Table of Contents
What Exactly is Firebase Cloud Messaging?
At its core, Firebase Cloud Messaging (FCM) is a free, cross-platform messaging solution provided by Google. It lets you reliably send notifications and data messages to mobile devices (iOS, Android), web browsers, and even desktop applications.
Think of FCM as a highly efficient global postal service. You (the app server) write a letter (the message) and hand it to the postmaster (FCM). The postmaster figures out exactly which mail truck to use (APNs for Apple, FCM SDK for Android, Web Push for browsers) and ensures it gets delivered to the specific house (the user’s device). You don’t have to worry about the traffic, the roads, or the truck maintenance. FCM handles the heavy lifting.
Why Should You Care About FCM?
Before FCM, if you wanted to send a push notification to an Android user and an iOS user, you had to write two completely different backend services. With FCM, you write one piece of code, and FCM translates it for the respective platforms.
Here are the main reasons I always lean on FCM:
- It is completely free: No hidden tier limits for standard push notifications.
- Cross-Platform: One unified API for Android, iOS, and Web.
- Highly Reliable: Built on Google’s robust infrastructure, meaning messages rarely get lost in the void.
- Versatile: You can send messages to a single user, a specific group, or millions of users subscribed to a topic simultaneously.
The Core Architecture: How the Magic Happens
To really understand FCM, you need to visualize how a message travels from your backend to a user’s pocket. It’s a three-part journey involving your app, your server, and Google’s servers.
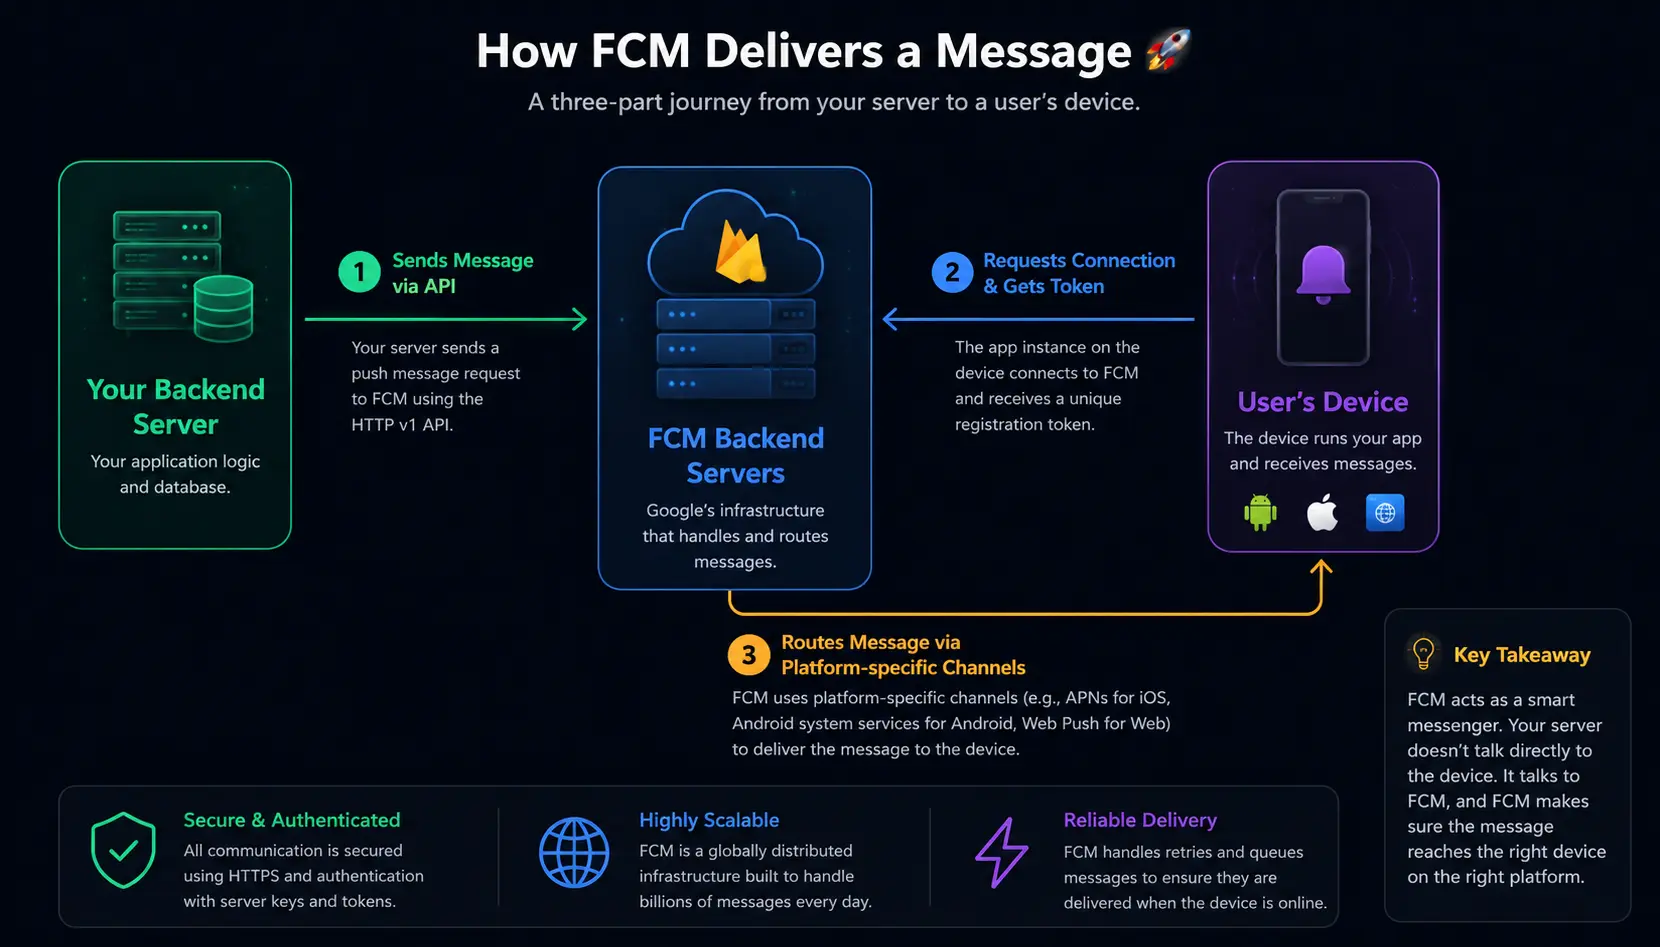
Let’s break down this diagram into plain English:
- The Device Registration: When a user installs your app, the FCM SDK inside the app reaches out to Google’s FCM servers. Google registers the device and hands back a unique Registration Token. Think of this token as the exact mailing address for that specific installation of your app.
- The Backend Dispatch: Your backend server takes that token, constructs the message you want to send, and fires it over to the FCM backend using the FCM HTTP v1 API.
- The Final Delivery: FCM receives your message, looks at the token, figures out if it needs to go to an iPhone, an Android, or a Chrome browser, and routes it accordingly. For iPhones, FCM acts as a proxy and forwards it to Apple’s APNs servers. For Android, it delivers it directly.
The Two Flavors of FCM Messages: Notification vs. Data
This is the part where most beginners trip up. I’ve seen seasoned developers scratch their heads wondering why their app behaves differently when it’s in the background versus the foreground. The secret lies in understanding the two types of payloads you can send: Notification Messages and Data Messages.
1. Notification Messages
These are messages where FCM does the displaying for you. You construct a payload with a notification key, and FCM automatically displays a little banner on the user’s device the moment it arrives.
When to use it: When you just want to say “Hey, you have a new message!” and you don’t need the app to process complex data in the background.
Here is what a Notification payload looks like in JSON:
{
  "message": {
    "token": "USER_REGISTRATION_TOKEN",
    "notification": {
      "title": "Breaking News!",
      "body": "The local team won the championship."
    }
  }
}2. Data Messages
Data messages are custom key-value pairs. FCM does not display these automatically. Instead, it hands the raw data over to your app, and your app’s code decides what to do with it.
When to use it: When you want to silently update the app’s data in the background, sync a chat conversation, or trigger a specific UI change without immediately alerting the user.
Here is a Data payload:
{
  "message": {
    "token": "USER_REGISTRATION_TOKEN",
    "data": {
      "score": "3x1",
      "gameId": "match_883",
      "action": "UPDATE_SCOREBOARD"
    }
  }
}The Hybrid Approach (and its pitfalls)
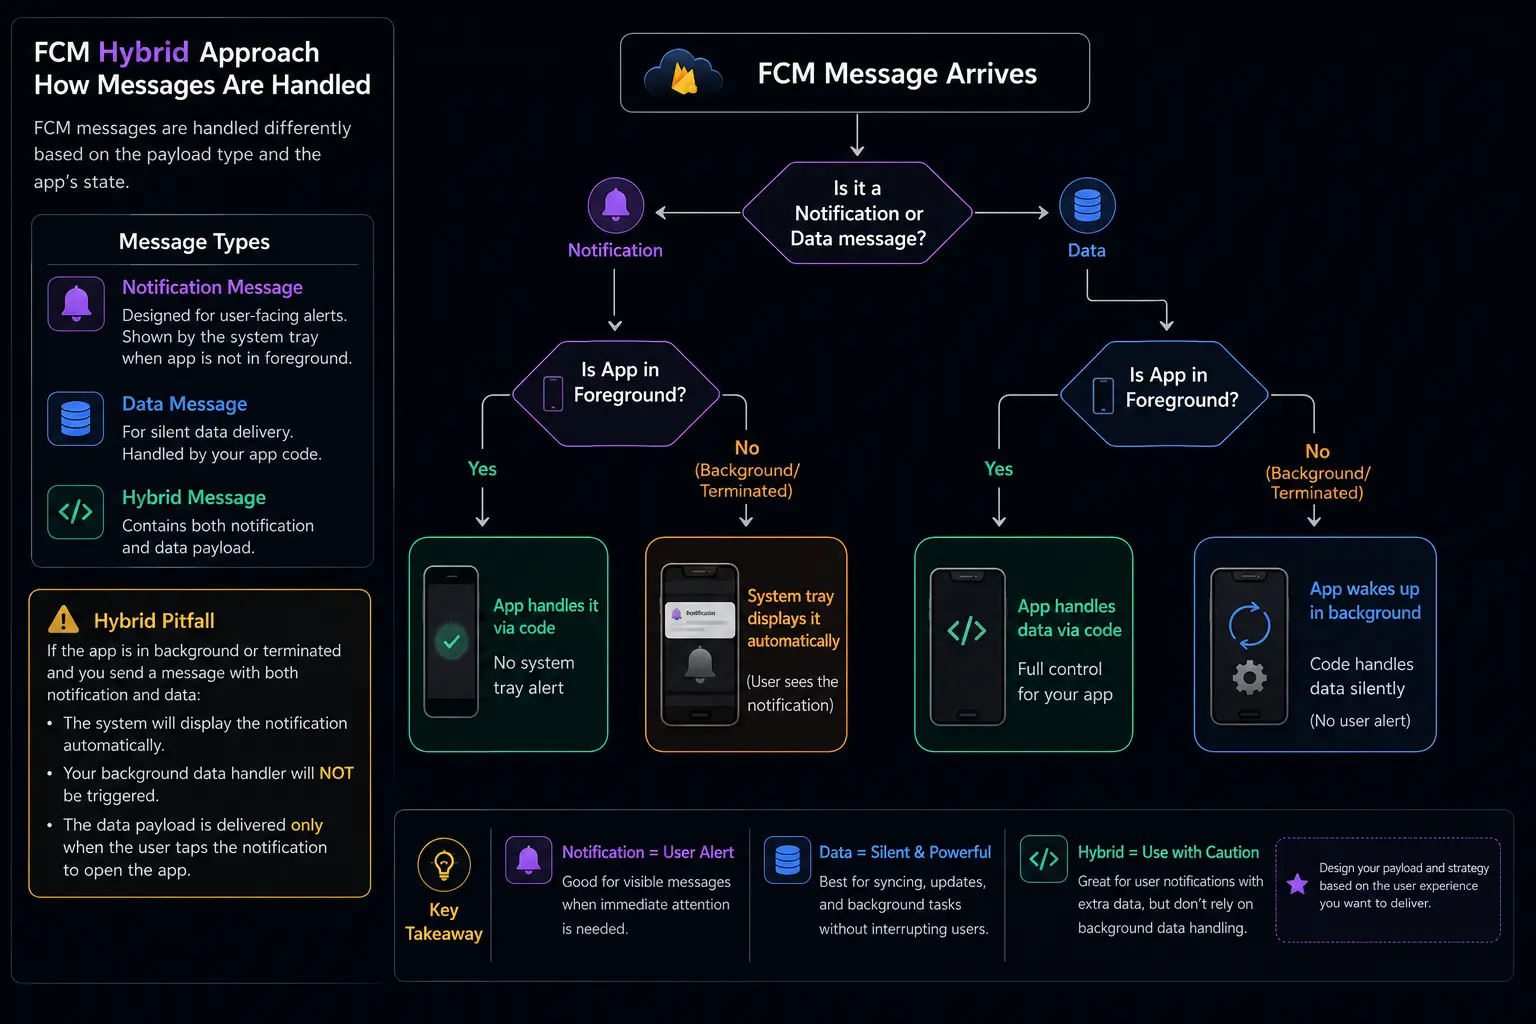
You can actually send both in one message. But be warned: if your app is in the background and a message containing both a notification and data payload arrives, the system will display the notification automatically, but it will not trigger your app’s background data handler. The data payload is only delivered to your code when the user taps the notification to open the app.
To help you visualize how these messages are handled depending on the app’s state, here is a handy decision tree:
Step 1: Setting Up Your Project (The Groundwork)
Before writing any code, you need to set up the project in the Firebase console. I’m going to walk you through the general flow.
- Go to the Firebase Console and create a new project.
- Add your specific app (Android, iOS, Web) to the project.
- Follow the on-screen instructions to download the configuration file.
- For Android, it’s
google-services.json. - For iOS, it’s
GoogleService-Info.plist.
- For Android, it’s
- Add these files to your app’s root directory.
For iOS, there is an extra step that historically caused me to lose hours of sleep: APNs Authentication. In the old days, you had to generate a .p12 certificate, renew it every year, and upload it to Firebase. Nowadays, I highly recommend using an APNs Auth Key (a .p8 file). It never expires, works for both development and production, and applies to all your Apple apps. Generate this in your Apple Developer Account and upload it to Firebase under Project Settings > Cloud Messaging.
Step 2: Getting the Registration Token
Once your app is set up, the first thing your app must do is ask FCM for a Registration Token.
Here is a quick example of how you’d do this in an Android app using Kotlin:
import com.google.firebase.messaging.FirebaseMessaging

fun getToken() {
    FirebaseMessaging.getInstance().token.addOnCompleteListener { task ->
        if (!task.isSuccessful) {
            Log.w("FCM_TAG", "Fetching FCM token failed", task.exception)
            return@addOnCompleteListener
        }

        // Get the new FCM token
        val token = task.result
        Log.d("FCM_TAG", "The token is: $token")

        // IMPORTANT: Send this token to your backend server!
        sendTokenToServer(token)
    }
}A word of advice from experience: Never assume a token is permanent. Tokens can rotate. If a user clears their app data, updates the app, or if the device security profile changes, FCM will generate a new token. Always implement a listener to catch token refreshes and update your backend database accordingly.
Step 3: Sending Messages from the Backend
Now that your app has a token and your backend has saved it, how do you actually send a message?
Google has deprecated the old legacy API, so you must use the FCM HTTP v1 API. To use it, your backend needs to authenticate. I prefer using the Firebase Admin SDK because it handles the OAuth token generation automatically.
Here is an example of sending a message using Node.js with the firebase-admin package:
const admin = require('firebase-admin');

// Initialize the Admin SDK with your service account credentials
const serviceAccount = require('./service-account-file.json');
admin.initializeApp({
  credential: admin.credential.cert(serviceAccount)
});

async function sendPushNotification(token) {
  const message = {
    notification: {
      title: 'Order Shipped!',
      body: 'Your package is on the way.'
    },
    data: {
      orderId: '12345',
      status: 'shipped'
    },
    token: token // The specific device we are targeting
  };

  try {
    const response = await admin.messaging().send(message);
    console.log('Successfully sent message:', response);
  } catch (error) {
    console.log('Error sending message:', error);
  }
}

sendPushNotification('USER_REGISTRATION_TOKEN');Notice how we passed both a notification object and a data object. The Admin SDK is incredibly powerful. It validates your payloads before sending them, saving you from frustrating API errors.
Advanced FCM: Targeting the Masses
Sending a message to one user is great. But what if you want to send a message to 100,000 users at once? If you loop through 100,000 tokens and send individual API requests, your server will time out, and Google might rate-limit you.
This is where Topic Messaging comes in.
Topic Messaging (Pub/Sub)
Topics work like a newsletter subscription. Your app subscribes to a topic (e.g., “sports_news”), and your backend sends one message to that topic. FCM handles the fan-out, delivering it to every subscribed device simultaneously.
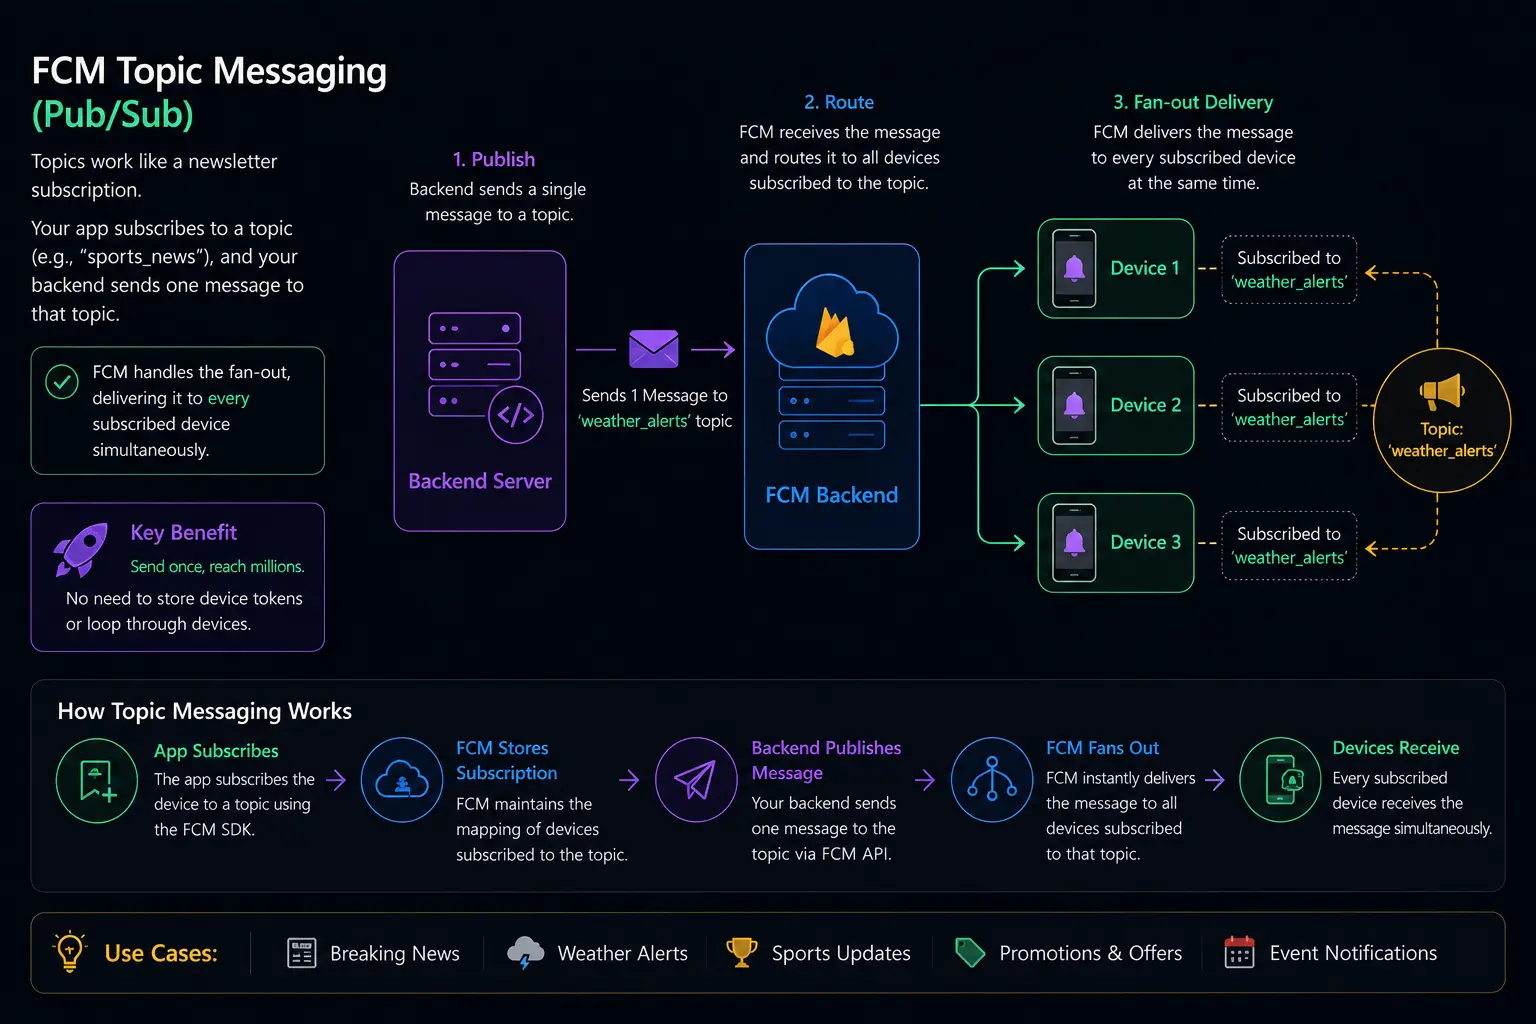
To subscribe a device in your app:
// Android Kotlin Example
FirebaseMessaging.getInstance().subscribeToTopic("weather_alerts")
    .addOnCompleteListener { task ->
        if (task.isSuccessful) {
            Log.d("FCM", "Subscribed to weather alerts!")
        }
}And to send a message to that topic from your backend, you simply replace the token key with a topic key:
const message = {
  notification: { title: "Storm Warning", body: "Heavy rain expected tonight." },
  topic: "weather_alerts"
};
admin.messaging().send(message);Condition-Based Targeting
You can even get logical with it. FCM allows you to use conditions. For example, let’s say you only want to send a message to users who are subscribed to sports_news OR tech_news, but ONLY if they are NOT subscribed to europe_only.
{
  "message": {
    "condition": "'sports_news' in topics || 'tech_news' in topics && !('europe_only' in topics)",
    "notification": {
      "title": "Global Update",
      "body": "New content available for your interests."
    }
  }
}Handling Notifications on the Client Side
This is where the frontend meets the backend. How your app handles the message depends entirely on whether the app is open, minimized, or completely killed.
Let’s look at an Android example using Kotlin, extending the FirebaseMessagingService.
class MyFirebaseMessagingService : FirebaseMessagingService() {

    // Called when a new token is generated
    override fun onNewToken(token: String) {
        Log.d("FCM_TAG", "Refreshed token: $token")
        sendTokenToServer(token)
    }

    // Called when a message is received
    override fun onMessageReceived(remoteMessage: RemoteMessage) {
        // Check if the message contains a data payload
        if (remoteMessage.data.isNotEmpty()) {
            Log.d("FCM_TAG", "Message data payload: ${remoteMessage.data}")
            handleDataMessage(remoteMessage.data)
        }

        // Check if the message contains a notification payload
        remoteMessage.notification?.let {
            Log.d("FCM_TAG", "Message Notification Title: ${it.title}")
            // If the app is in the foreground, we need to build and show the notification ourselves!
            sendNotification(it.title!!, it.body!!)
        }
    }

    private fun handleDataMessage(data: Map<String, String>) {
        // Do background sync work here
        val orderId = data["orderId"]
        // Sync database...
    }

    private fun sendNotification(title: String, body: String) {
        // Use NotificationCompat to build and display a local notification
    }
}The Foreground vs. Background Conundrum
Here is the golden rule that trips up 90% of developers:
If your app is in the foreground (open and visible), and a Notification Message arrives, FCM will not display a system tray alert. It assumes you don’t want to interrupt the user while they are actively using your app. Instead, it triggers onMessageReceived, and it is entirely up to you to write the code to display a local notification.
If your app is in the background (minimized or killed), and a Notification Message arrives, FCM automatically displays the system tray alert. Your onMessageReceived code is not triggered immediately; it is only triggered if the user taps the notification.
The Solution? Use Data Messages
If you want complete, 100% control over how notifications behave regardless of whether the app is in the foreground or background, send Data Messages.
When a Data Message arrives, onMessageReceived is always triggered, even if the app is completely killed. You can then extract your custom data and manually display a local notification using the OS’s native notification builder. This is the strategy I use for almost all production apps. It guarantees consistency.
Real-World Examples and Use Cases
Let’s look at how FCM actually gets used in the wild.
1. A Chat Application (WhatsApp/Telegram clone)
- Scenario: User A sends a message to User B.
- Backend: User A’s app sends the message to the backend. The backend saves the message to the database, then triggers an FCM Data Message to User B.
- Payload:
{"action": "new_message", "sender": "Alice", "text": "Hey!"} - Client: User B’s app receives the payload in the background. If User B is in the chat screen, the app updates the UI instantly. If User B is not in the app, the client builds a local notification saying “Alice: Hey!” and displays it.
2. An E-Commerce App (Amazon/Shopify)
- Scenario: A user’s order status changes from “Processing” to “Shipped”.
- Backend: The fulfillment system triggers an API call to FCM with a Notification Payload.
- Payload:
{"title": "Your order has shipped!", "body": "Tracking number: 12345"} - Client: Because it’s a Notification payload, the system tray handles it automatically. The user taps it, and the app opens to the order tracking screen.
3. A Live Sports App (ESPN)
- Scenario: The home team scores a touchdown.
- Backend: The backend sends a message to the
home_team_fanstopic. - Client: Millions of devices subscribed to that topic receive a brief data payload to update the score on their lock screen widgets without pinging the main server, saving massive bandwidth.
The “Gotchas” and Pro-Tips from the Trenches
Over the years, I’ve made every FCM mistake in the book. Let me save you some time and frustration.
1. The iOS Notification Permission Trap
On Android, notifications are enabled by default. On iOS, they are disabled by default. You must prompt the user for permission. If you implement FCM flawlessly but forget to request authorization on iOS, your messages will silently fail. Always request permission early, preferably after explaining to the user why you want to send them notifications.
2. Handling “Unregistered” Tokens
Users uninstall apps. When they do, their FCM token becomes invalid. If your backend tries to send a message to an invalid token, FCM will respond with an error: UNREGISTERED.
Pro-Tip: Write logic in your backend to catch this specific error and immediately delete that token from your database. If you don’t, your database will become a graveyard of dead tokens, slowing down your queries and wasting API calls.
3. Android 13+ Notification Permissions
Starting with Android 13 (API level 33), Google copied Apple. Android apps now require explicit user permission to post notifications. If your target SDK is 33 or higher, you must request the POST_NOTIFICATIONS runtime permission before notifications will be displayed. Don’t learn this the hard way after an app update breaks notifications for all your users!
4. Do Not Put Sensitive Data in Payloads
FCM payloads are not heavily encrypted end-to-end by default. Do not put sensitive data (like passwords, API keys, or sensitive health information) in the data or notification payload. Instead, send a generic notification (“New document available”) and have the app fetch the sensitive data securely from your backend upon receiving the push.
5. Testing in the Firebase Console
The Firebase Console has a “Compose Notification” tool. It is fantastic for testing. However, be aware that when you send a notification from the console, it is essentially treated as a Notification Message with a high priority. It behaves slightly differently than a Data Message sent via code. Use the console for quick sanity checks, but always test your actual backend code.
Troubleshooting: Why Didn’t My Notification Arrive?
We’ve all been there. You hit send, the API returns a success message, but the phone stays silent. Here is my mental checklist when troubleshooting:
| Symptom | Likely Cause | Solution |
|---|---|---|
| Success on backend, nothing on device | App is force-stopped, or battery optimization killed it (Android). | Ask user to check app settings and disable aggressive battery savers for your app. |
| Works on Android, fails on iOS | Missing APNs Auth Key in Firebase, or iOS permissions not requested. | Double-check the .p8 key in Firebase settings. Ensure app prompts for iOS permissions. |
| Notification arrives, but custom data is missing | You sent a hybrid message, and the app was in the background. | Switch to a pure Data Message so onMessageReceived is always triggered to parse data. |
| Notifications delayed on Android | Device is in Doze mode, or message priority is set to “normal”. | Set the Android priority to "HIGH" in your payload to bypass Doze mode restrictions. |
The FCM HTTP v1 Migration: A Necessary Evil
I want to take a brief moment to talk about the FCM HTTP v1 API. If you look at older tutorials online, you’ll see people using the legacy API, which involves simply passing a server key in the header.
Google officially deprecated the legacy API. You must use the v1 API now.
Why? Security. The legacy API used a static server key. If that key leaked (which happened a lot), anyone could send spam to your users. The v1 API uses OAuth 2.0. It requires your backend to generate a short-lived access token using your service account credentials. It’s slightly more setup, but it is infinitely more secure. If you are starting a new project today, ignore any tutorial that mentions “legacy API” or “server key” in the authorization header.
Conclusion: Wrapping It All Up
Firebase Cloud Messaging is one of those rare tools that actually lives up to the hype. It abstracts away the agonizing complexity of cross-platform push notifications and lets you focus on building features.
To summarize our journey:
- Setup: Connect your app to Firebase and get the config files.
- Tokens: Generate a registration token on the client and send it to your backend.
- Payloads: Choose between Notification messages (let the system handle it) and Data messages (let your code handle it). When in doubt, use Data messages for maximum control.
- Sending: Use the Firebase Admin SDK on your backend to securely send messages via the HTTP v1 API.
- Scaling: Use Topic Messaging to broadcast to millions of users effortlessly.
Push notifications, when used respectfully, are a superpower for user engagement. They can bring users back to a dead app or deliver critical real-time information. But with great power comes great responsibility—don’t spam your users, or they will revoke that notification permission faster than you can say “uninstall.”
If you follow the steps and principles I’ve laid out from my time in the trenches, you’ll have a robust, scalable push notification system up and running in no time. Happy coding!
References and Further Reading
- Firebase Cloud Messaging Official Documentation – The ultimate, up-to-date source of truth for SDK setup and API references.
- Firebase Admin SDK Node.js Guide – Deep dive into setting up the backend server logic.
- Apple Push Notification service (APNs) Overview – Crucial reading for understanding the iOS side of the FCM proxy chain.
FAQs
Do I have to pay to use Firebase Cloud Messaging, or is there a hidden catch?
Keep your wallet closed. FCM is completely free for standard push notifications. Google doesn’t charge you based on how many messages you send or how many users you have. I’ve used it on massive enterprise apps and tiny side projects, and I’ve never seen a bill for basic push delivery. There are some paid enterprise features if you want to import huge segments of user data from third-party tools, but for 99% of developers, the free tier is all you will ever need.
Why does my notification show up when my app is closed, but not when I have it open on my screen?
This is the most common headache I see! By default, if your app is open (in the foreground), the system assumes you don’t want to interrupt the user with a banner at the top of the screen. Instead, FCM hands the message directly to your app’s code, expecting you to handle it (like showing an in-app pop-up). If the app is closed or minimized, the operating system automatically displays the banner in the notification tray for you.
I saved a user’s notification token in my database. Can I just use that forever?
Nope. Think of a token like a temporary visitor pass. If the user updates the app, clears the app’s cache, or if their phone’s security settings change, FCM will generate a brand-new token and invalidate the old one. Your app needs to have a listener running that catches these “token refresh” events and immediately sends the new token to your backend so your database stays up to date.
If I am building an app for both iOS and Android, do I have to write two completely different backend systems to send notifications?
Not at all! That’s the beauty of FCM. You write one piece of code on your backend, and FCM acts as a translator. It takes your message, figures out if the destination is an iPhone, an Android, or a web browser, and routes it through the correct pipes. You just talk to FCM, and it handles the platform-specific delivery.
What happens if I send a notification to someone who deleted my app?
When an app is uninstalled, its notification token becomes useless. If your server tries to send a message to that dead token, FCM will bounce it back with an “unregistered” error. My advice: make sure your backend listens for that specific error and automatically deletes the dead token from your database. Otherwise, you’re just wasting space and time trying to message ghosts.
If a user’s phone is off or in airplane mode, will they miss my notification?
They won’t miss it. FCM servers will hold onto the message for a while. Once the user turns their phone back on or reconnects to the internet, FCM will deliver the waiting message. However, FCM doesn’t hold them forever—messages generally expire after about 28 days if the device never comes back online.
My notifications work perfectly on my Android test phone, but nothing happens on my iPhone. What am I missing?
Welcome to iOS development! There are usually two culprits here. First, Apple requires you to explicitly ask the user for permission to send them notifications. If you don’t add the code to pop up that “Allow Notifications?” dialogue, iOS will silently block everything. Second, you need to make sure you uploaded your Apple Push Notification (APNs) Auth Key to the Firebase console. Without that key, FCM can’t talk to Apple’s servers.
Is there a limit to how many people I can send a notification to at the exact same time?
If you are sending messages one-by-one to individual tokens, you’ll eventually hit a rate limit and your server will slow down. But if you use FCM’s “Topic Messaging” feature, you can send a single message to a topic (like “news_alerts”), and millions of subscribed users will get it instantly. FCM handles the massive distribution behind the scenes, so your server only has to send one message.
Is it safe to send sensitive stuff like passwords or private chat messages inside the notification?
Absolutely not. Notifications are not designed to be highly secure, encrypted vaults. Someone intercepting the network traffic could potentially read the payload. If you need to tell a user they have a new bank statement, just send a generic notification saying “New statement available.” Then, when they tap it and open the app, have the app securely log in and fetch the actual statement from your secure database.
Will having Firebase Cloud Messaging running in my app drain my users’ batteries?
No, FCM is actually incredibly smart about battery life. It doesn’t keep your app running constantly to check for messages. Instead, it uses a single, shared, optimized connection at the operating system level. When a message arrives, the OS briefly wakes up your app to deliver it, and then puts it back to sleep. It’s highly efficient and won’t cause your users to complain about battery drain.