Windows 11 brings a sleek and modern interface, but as with any operating system, over time, performance can slow down due to various factors. Whether you’re a casual user or a power user, keeping your PC running smoothly is essential for productivity and a seamless experience. Lets explore some practical tips to boost your Windows 11 performance, ensuring you get the most out of your system.
On This Page
Table of Contents
Disable Unnecessary Startup Programs
When you power on your Windows 11 computer, numerous programs may launch automatically, affecting the speed of your boot time and overall system performance. By managing these startup programs, you can ensure that your PC runs smoothly and efficiently.
Steps to Disable Unnecessary Startup Programs
Follow these simple steps to reduce the number of programs that launch at startup:
- Right-click on the Taskbar and select Task Manager.
- Click on the Startup tab; you’ll see a list of programs that run at startup.
- Identify the programs that you do not need at startup. Look for items with High or Medium impact.
- Right-click on the unnecessary program and select Disable.
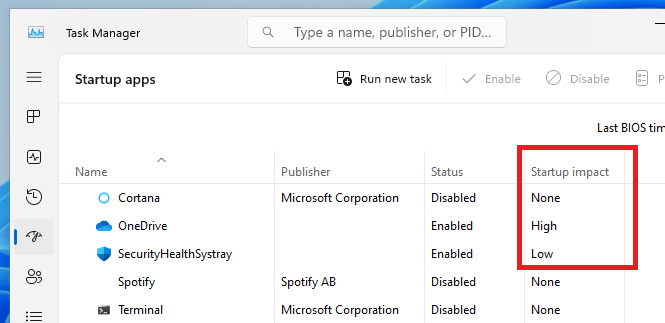
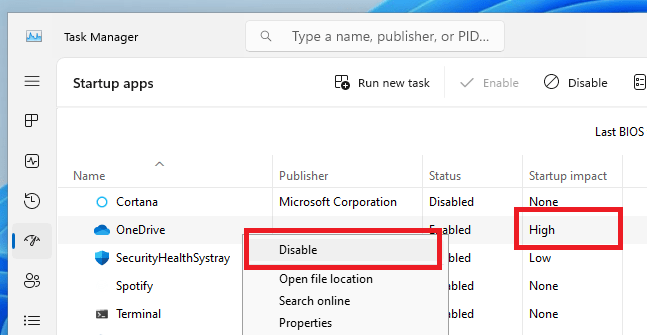
🏷️ For example, if you see programs like Spotify or Zoom but you only use them occasionally, disabling them can significantly enhance your boot speed.
By limiting the number of startup items, you can:
- Improve boot time, allowing your computer to start faster.
- Enhance overall system performance, making tasks smoother and more efficient.
- Reduce system resource consumption, leading to better battery life on laptops.
By reducing the clutter at startup, you enhance your user experience and keep your system running like new!
Manage Background Processes
In Windows 11, background processes can significantly affect your system’s performance. Identifying and managing these resource-hogging applications is essential for an optimal experience. Let’s delve into the best methods to handle them.
Identifying Resource-Hogging Applications
To spot applications that consume excessive CPU and memory, use the Task Manager:
- Right-click the Taskbar and select Task Manager.
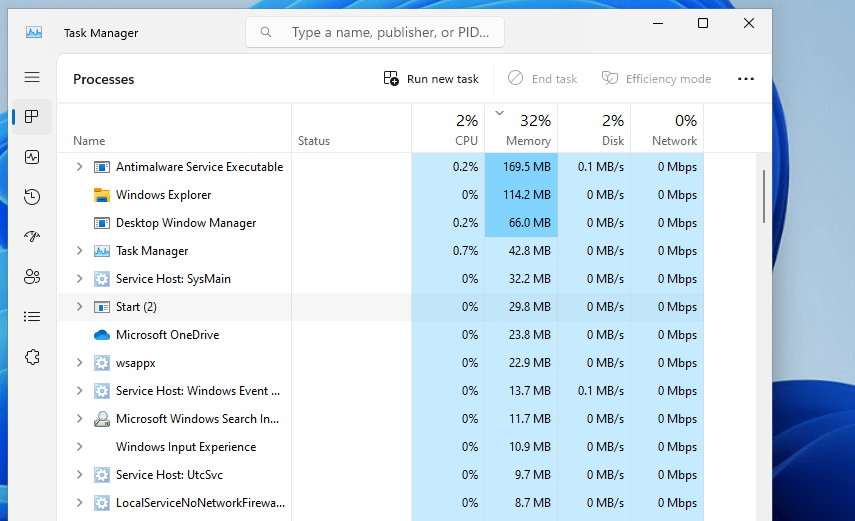
- Click on the Processes tab to see a list of running applications.
- Sort the list by CPU or Memory to find the culprits.
🛠 For instance, if you notice that Google Chrome is using a large amount of CPU, it might be time to close some tabs or even restart the browser.
Practical Tips to Improve Performance
Once you’ve identified the resource-hogging applications, here are some practical steps to reclaim your system’s performance:
| Action | Description |
|---|---|
| Close Unused Applications | Quit apps that aren’t currently needed to free resources. |
| Disable Startup Programs | Use Task Manager to disable unwanted startup apps that slow down boot time. |
| Update Software | Ensure all applications are up to date to optimize performance and security. |
🌟 Regularly monitoring and managing background processes will help keep your Windows 11 running smoothly!
Optimize Storage with Disk Cleanup
If you are running out of space on your Windows 11 drive , using the built-in Disk Cleanup tool can help you reclaim valuable storage. This step-by-step guide will walk you through the process of using Disk Cleanup to remove unnecessary files efficiently.
Steps to Use Disk Cleanup
Follow these simple steps to initiate Disk Cleanup:
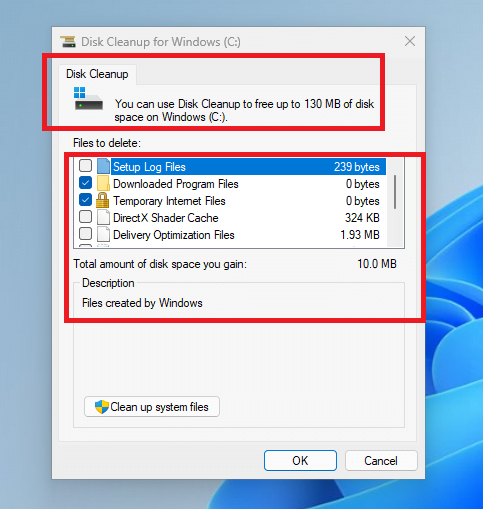
- Press the Windows key on your keyboard and type Disk Cleanup.
- Select the Disk Cleanup tool from the search results.
- A window will pop up asking you to choose a drive. Typically, you’ll want to select Drive C: (where Windows is installed).
- Click OK to start the scanning process.
Selecting Files to Delete
After the scan, Disk Cleanup will present you with a list of files you can delete. Here’s how to select them:
| File Type | Description |
|---|---|
| Temporary files | Files that are no longer needed by your system. |
| Recycle Bin | Items you’ve deleted that are still stored temporarily. |
| Thumbnails | Previews of images and documents that can be regenerated. |
Select the files you wish to delete and click OK. Confirm your choice, and the tool will begin removing these files. 🎉
Alternative Third-Party Tools
If you’re looking for more features, consider using third-party tools like CCleaner or Wise Disk Cleaner. These tools offer advanced options for optimizing your storage space.
Use Performance Mode
Performance Mode in Windows 11 is a feature designed to enhance the responsiveness and speed of your PC. By prioritizing system resources, it allows for smoother operation of demanding applications and games. This mode optimizes CPU and memory usage, ensuring that your tasks run without unnecessary lag.
Benefits of Enabling Performance Mode
- Faster Task Execution: Experience quicker load times for applications.
- Improved Gaming Performance: Enjoy a superior gaming experience with reduced input lag.
- Enhanced Multitasking: Smoothly run multiple applications without system sluggishness.
How to Enable Performance Mode
Activating Performance Mode in Windows 11 is a straightforward process. Follow the simple steps below:
- Click on the Start Menu and select Settings. 🛠️
- Navigate to System and then click on Power & battery.
- Under Power mode, select Best performance.
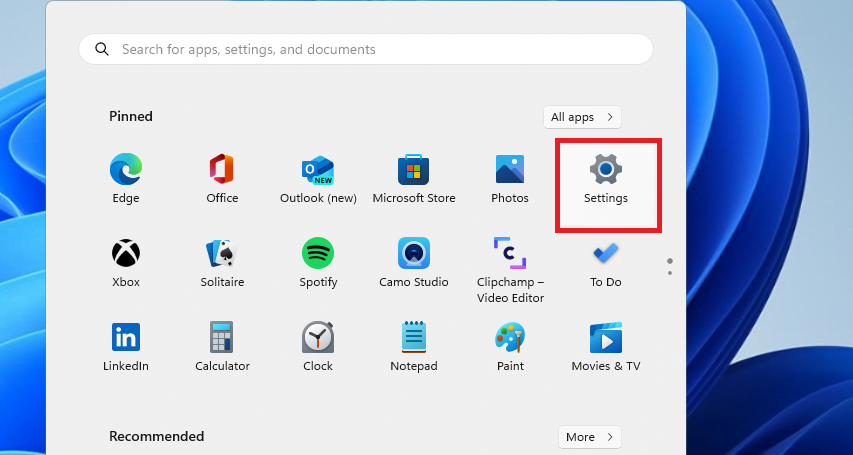
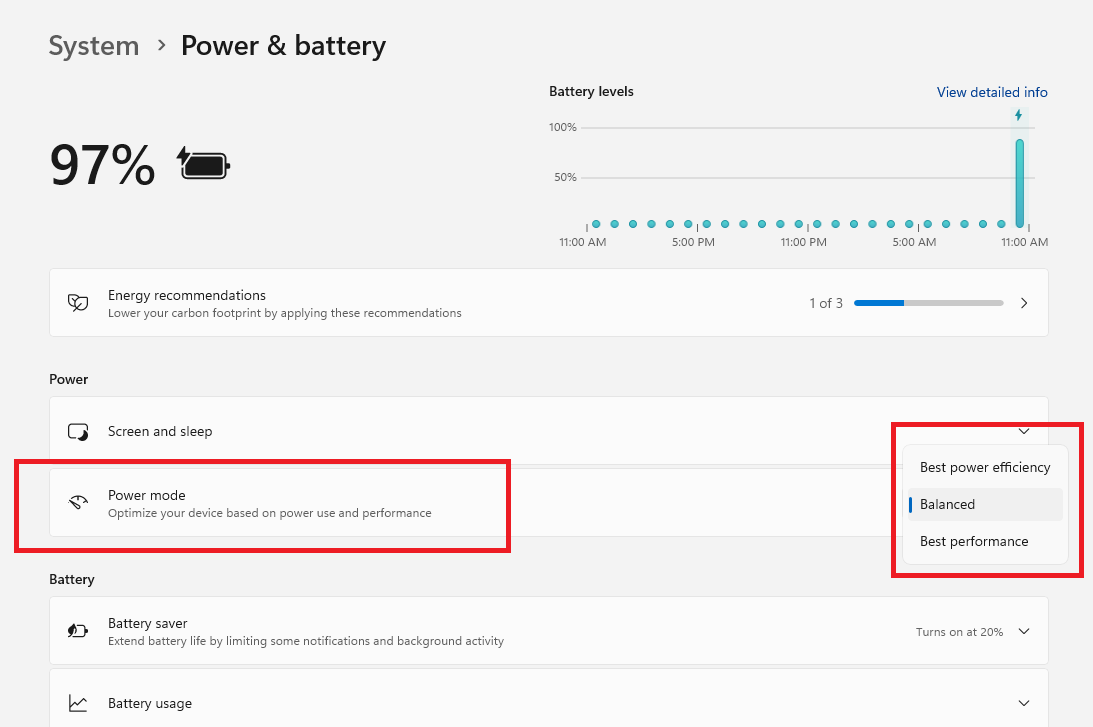
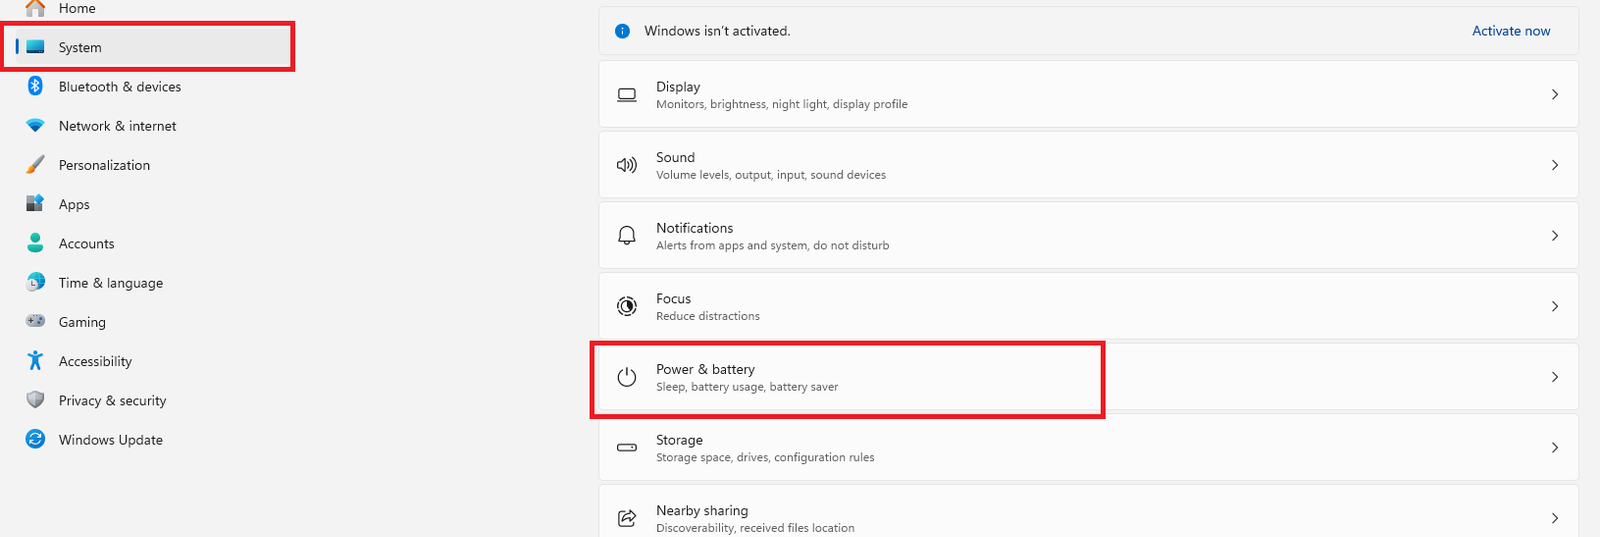
This mode will immediately prioritize system resources for enhanced speed and responsiveness. For example, if you’re gaming or using resource-intensive applications, this setting can significantly improve performance.
Disable Visual Effects
Windows 11 is equipped with various visual effects that enhance its aesthetic appeal. However, these effects can be resource-intensive, particularly on older hardware. By turning off or adjusting these settings, you can significantly improve performance. 🚀
Enhancing Performance by Disabling Visual Effects
Disabling visual effects can lead to smoother operations and faster response times. Here are the key benefits:
- Reduced latency: Minimizes delays during tasks.
- Increased speed: Faster application launches and system responsiveness.
- Enhanced battery life: Lower power usage for laptops.
Steps to Turn Off Visual Effects
Follow these simple steps to modify your visual effects settings:
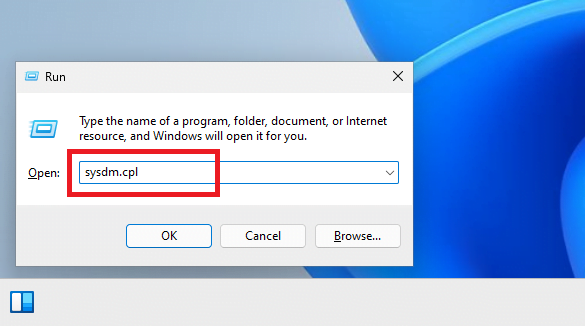
- Press Windows + R to open the Run dialog.
- Type sysdm.cpl and hit Enter.
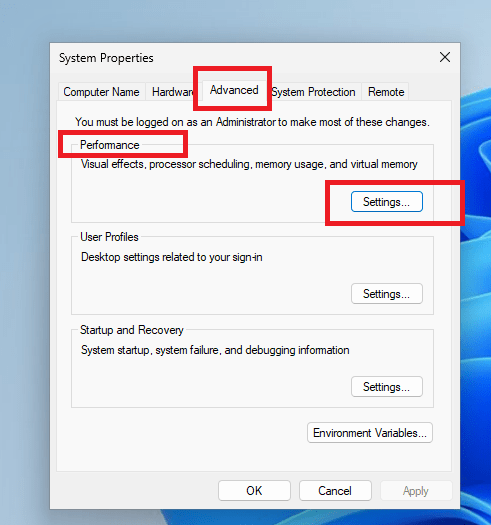
- In the System Properties window, click on the Advanced tab.
- Under the Performance section, select Settings.
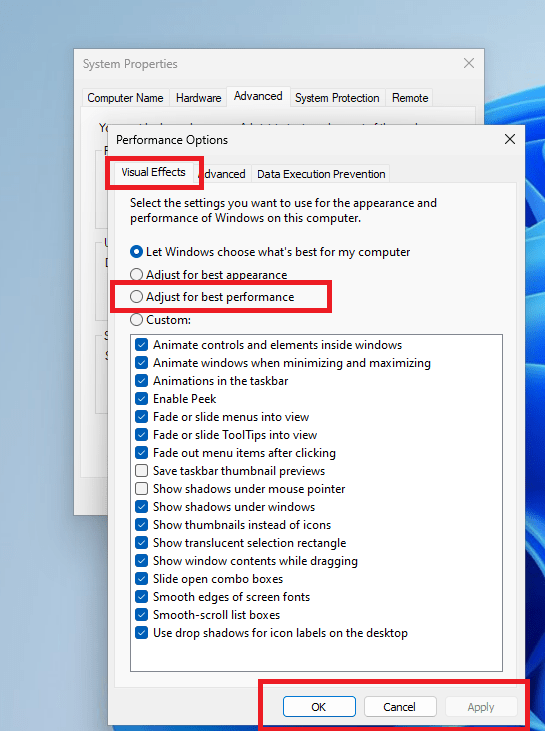
- In the Performance Options window, choose Adjust for best performance.
- Click Apply and then OK to save changes.
Utilize Storage Sense
Windows 11 offers a powerful feature known as Storage Sense, which automates file cleanup, ensuring optimal storage management. Lets explore the steps to enable and customize Storage Sense to keep your computer’s storage efficient.
How to Enable Storage Sense
To enable Storage Sense and configure its settings, follow these steps:
- Open the Settings app by pressing Windows + I.
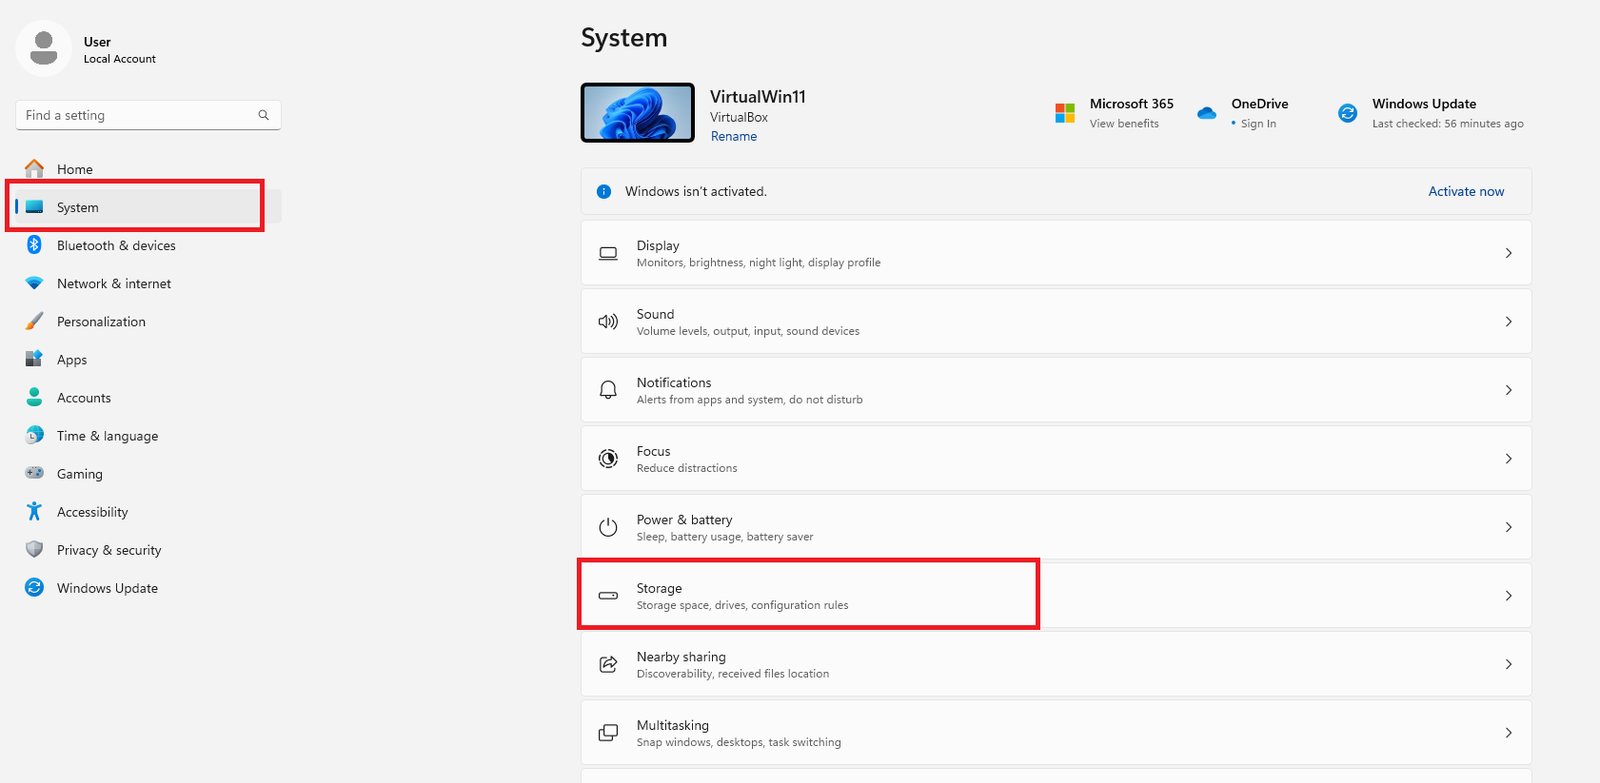
- Navigate to System and click on Storage.
- Toggle the Storage Sense option to On.
- Click on Configure Storage Sense or run it now to set your preferences.
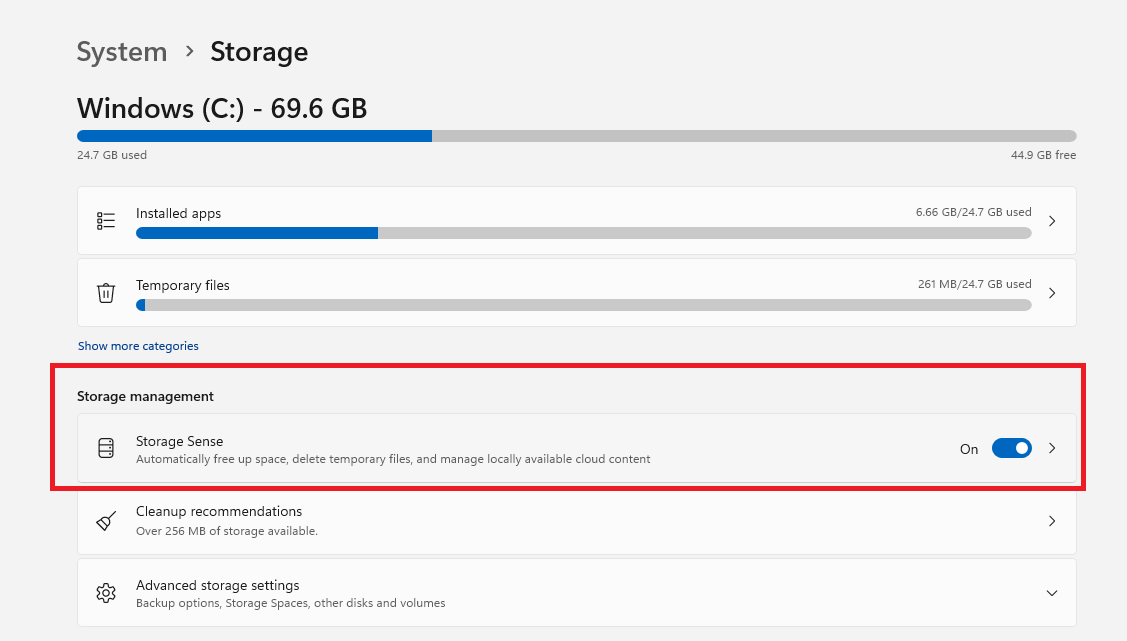
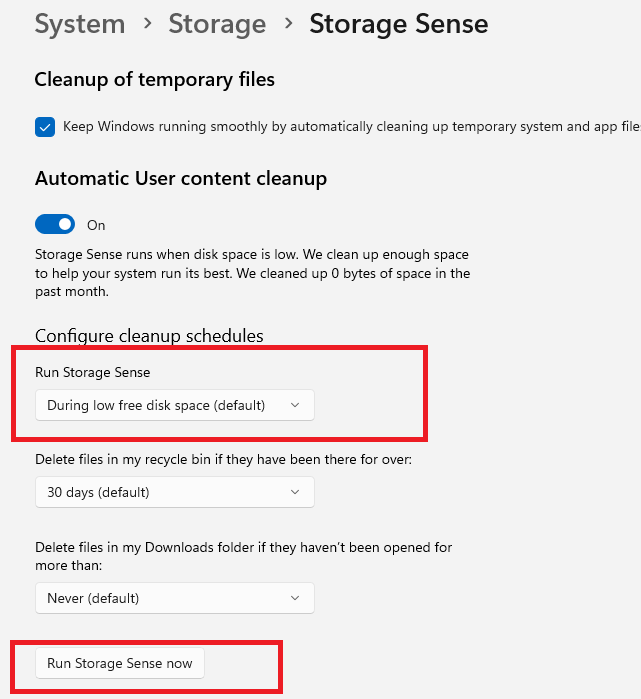
Here, you can choose how often to run Storage Sense (Daily, Weekly, or Monthly) and select options regarding temporary files and the Recycle Bin.
Utilizing Storage Sense can have several advantages:
| Benefit | Description |
|---|---|
| Automated Cleanup | Removes unnecessary files without manual intervention. |
| Optimized Performance | Improves system performance by freeing up storage space. |
| Enhanced Convenience | Saves time and effort, allowing focus on more important tasks. |
For example, if you regularly download files for a project and forget to clean up afterwards, Storage Sense will automatically remove those temporary files. This keeps your computer running smoothly without the clutter. 🛠️
Uninstall Unnecessary Software
Having unutilized programs on your Windows 11 system can clutter your device and affect its performance. By uninstalling these unnecessary applications, you free up valuable system resources, enhancing speed and efficiency.
Steps to Review Installed Programs
Before you start uninstalling software, it’s essential to review what’s currently installed on your system. Here’s how:
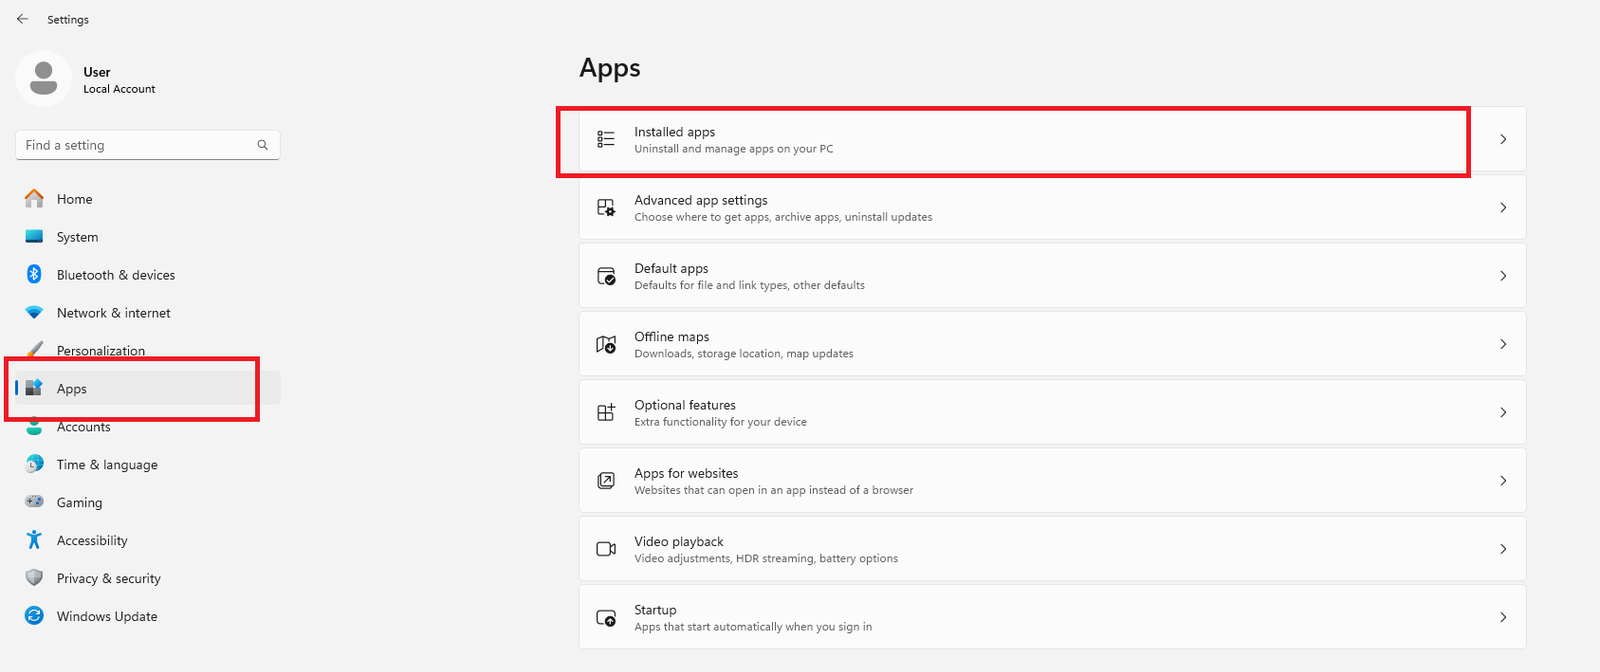
- Click on the Start Menu icon.
- Select Settings.
- Navigate to Apps and choose Apps & features/Installed Apps.
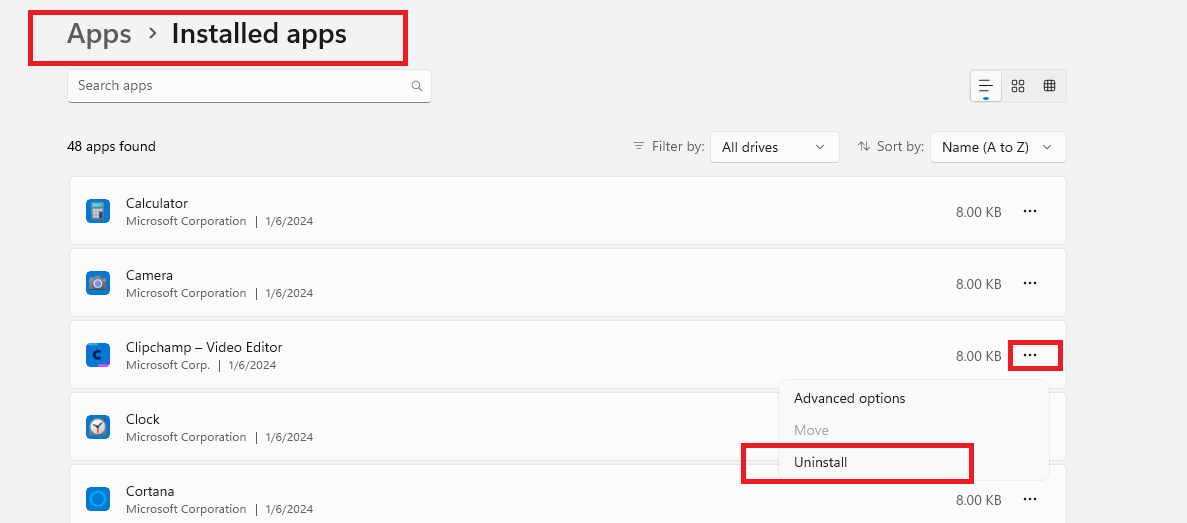
This will present you with a comprehensive list of installed programs.
Uninstalling Programs in Windows 11
Once you have identified the programs you no longer use, follow these simple steps to uninstall:
- Select the program you wish to remove.
- Click on the Uninstall button.
- Follow the on-screen instructions to complete the removal.
For example, if you find an old game that you haven’t played in months, uninstalling it could recover significant space!
Check for Malware and Viruses
If you are experiencing sluggish performance on your Windows 11 PC, It might be a sign of malware or viruses affecting your system. Fortunately, there are effective methods to identify and remove these threats. Let’s explore how to use Windows Security and third-party antivirus software for effective malware scanning.
Using Windows Security
Windows Security is built into your operating system and is always a good first step. Here’s how to use it:
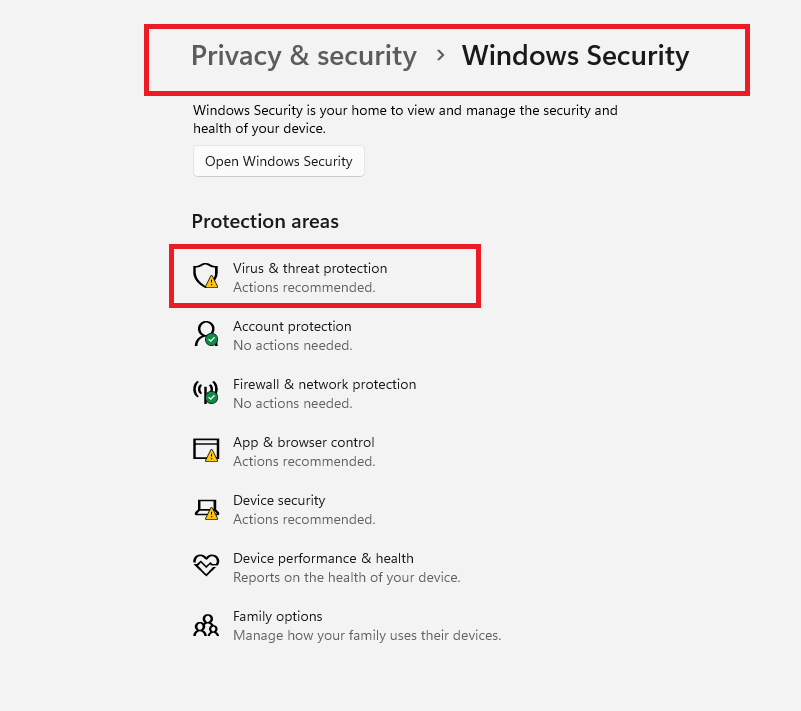
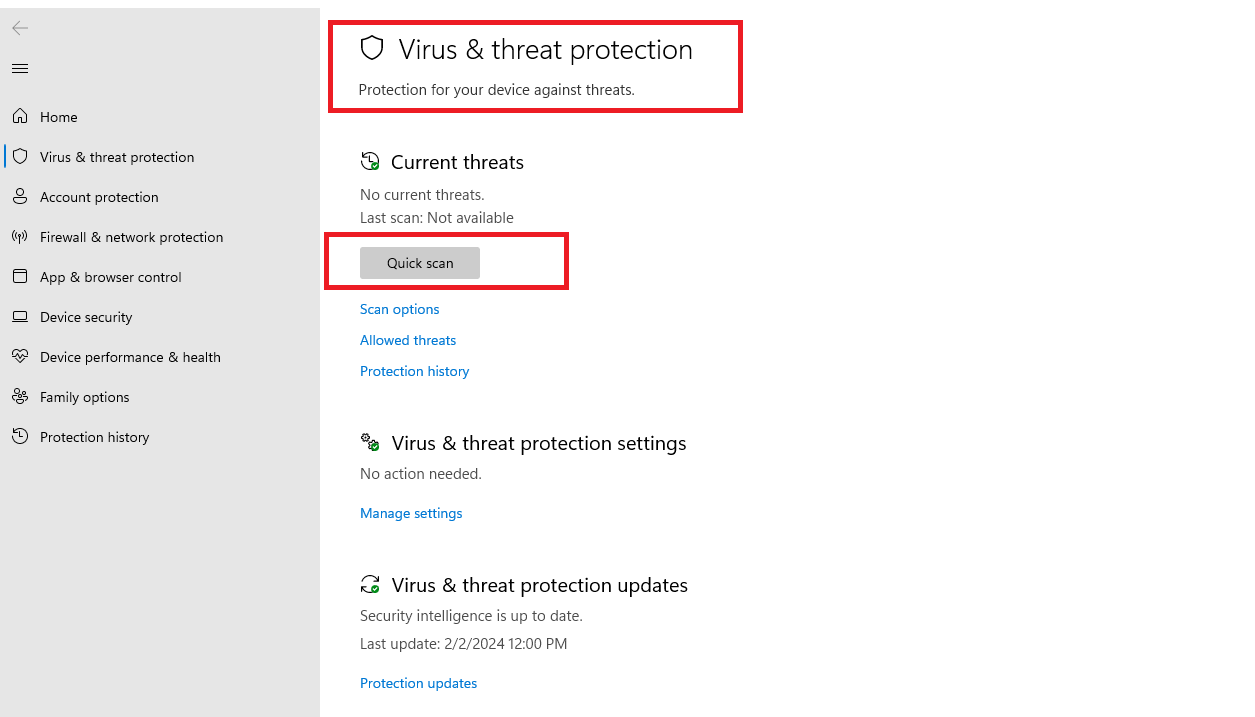
- Open the Start menu and type Windows Security to open it.
- Select Virus & Threat Protection.
- Click on Quick Scan to scan your PC for malware and viruses. For a more thorough check, choose Scan options and select Full scan.
This process will help identify any potential threats that could be harming your system’s performance. 🛡️
Using Third-Party Antivirus Software
If you need a more advanced solution, consider third-party antivirus software. Common choices include:
| Antivirus Software | Key Features |
|---|---|
| Malwarebytes | Real-time protection, malware removal |
| Norton | Comprehensive security suite, cloud backup |
To scan for malware with these programs, install the software, run a full system scan, and follow the on-screen instructions to remove any detected threats.
Update Drivers and Windows
In the digital age, maintaining your system is crucial for optimal performance. Regularly updating your Windows 11 drivers ensures that your computer runs smoothly, without errors or glitches. This practice is essential for several reasons:
- Enhanced Security: Updates often include patches for vulnerabilities that can be exploited by hackers. Keeping your drivers and system updated minimizes risks and secures your personal data.
- Bug Fixes: Developers continually work to resolve issues that may affect system functionality. Regular updates can help eliminate bugs that disrupt your experience.
- Improved Performance: New driver versions often come with performance enhancements that ensure better utilization of hardware capabilities.
Updating your Windows 11 drivers and operating system can significantly enhance your overall user experience. Some benefits include:
| Benefit | Description |
|---|---|
| Efficiency | Updates improve system responsiveness, enabling tasks to be processed faster. |
| Compatibility | Ensures your software and hardware work seamlessly together, avoiding instability. |
| Access to New Features | Updates may introduce new features that enhance usability and enjoyment. |
Upgrade Hardware (RAM, SSD)
In today’s fast-paced digital environment, performance is key! If you’re using Windows 11 and notice your system lagging during routine tasks or gaming, it may be time to consider hardware upgrades. Common scenarios include:
- Frequent slowdowns when multiple applications are open.
- Long loading times during software installations or updates.
- Lagging in graphically intensive activities like gaming or video editing.
Benefits of Upgrading RAM
Random Access Memory (RAM) plays a vital role in your computer’s performance. If your system has 8GB of RAM or less, consider upgrading to 16GB or 32GB for better multitasking capabilities. Here are some indicators that additional RAM might be beneficial:
- Mood for Gaming? 🎮 More RAM means less lag!
- Running Virtual Machines? Increase RAM for smoother performance.
- Multitasking Madness? More RAM can help manage multiple applications effectively.
Switching to an SSD for Enhanced Performance
Solid State Drives (SSDs) offer speed that traditional Hard Disk Drives (HDDs) can’t match. When to switch to an SSD? Here are some key points:
- Are you still using an HDD? When you upgrade to an SSD, boot times can drop from minutes to seconds!
- With applications taking longer to load, an SSD provides instant access.
- Plan to store large files? SSDs provide faster writes and reads, making file transfers significantly quicker.
In conclusion, if your Windows 11 experience feels sluggish, evaluating your RAM and storage can lead to substantial performance improvements. Take the leap, and enjoy a smoother, faster computing experience!
FAQs
How can I speed up my Windows 11 computer?
You can speed up your PC by disabling unnecessary startup programs, freeing up storage, managing background processes, and updating Windows and your drivers.
Do I need to upgrade my hardware to make Windows 11 faster?
Not always. Simple fixes like adjusting settings, cleaning up files, or disabling visual effects can help. But if your PC still feels slow, upgrading your RAM or switching to an SSD can make a big difference.
Does turning off visual effects improve performance?
Yes, turning off or reducing visual effects like animations can improve performance, especially on older computers.
How do I clean up storage on Windows 11?
You can use built-in tools like Disk Cleanup or Storage Sense to delete temporary files, old downloads, and other unneeded data.
Can viruses slow down my Windows 11 PC?
Yes, viruses and malware can cause slowdowns. Running regular virus scans helps keep your PC secure and performing well.


